
Baking with stevia – lemon and raspberry cheesecake-type thing
Posted: July 14, 2019 Filed under: Uncategorized Leave a commentPrompted by a friend’s Facebook post, I said that I would try to bake a dessert containing flax seeds that was low on the glycemic index. They said they could not have dates, bananas or oats as these cause spikes in their blood sugar levels, obviously sugar, maple syrup, agave etc. are not welcome either, but some berries seem to be okay.
This is my first attempt at baking with alternative sweeteners – although the stevia I bought is bulked out with maltodextrin which I don’t think is great for diabetics, I do know that you can buy liquid stevia which is basically just extract of the plant and should have no effect on blood sugar, and I will try using some of that in my next attempt.

Close-up of square slice of pale pink dessert on beige coloured almond-flax biscuit base, presented on a bamboo cutting board. The background shows a section of the dessert in its Pyrex baking dish.
To be honest, this is not too bad (I’m really pleased with the texture!), but the sweetness levels need some work, maybe a bit of a different kind of sweetener in addition to the stevia, it tastes good at first bite but then it’s got that sort of disappointing “thin” taste that artificial sweeteners always have for me. However, for the record here it is…
Recipe
For the base
1 cup flaked almonds
2 Tbs flax seeds
1 tsp ground ginger
1 Tbs stevia (I’m using Morrisons powdered stevia, which claims 1 spoonful = a spoonful of sugar in terms of sweetness)
I Tbs oil
1.5 Tbs water
pinch salt
Method: grind almonds and flax seeds in blender/food processor until breadcrumby (I used the dry container for the vitamix), add the ginger, salt and stevia and pulse to mix, tip into baking dish (I used a small pyrex dish, 0.8litres?), add water to form dough, add oil when you realise dough is way too sticky to handle. Press into bottom of pan with greased fingers, bake at 200c (180 if you have fan assist) for 15 minutes.
Filling:
medium-firm tofu, about 2 cups/350-400g (I get Tofu King that comes in 3 blocks in water and claims to be 600g tofu, I just used 2 of the blocks) – you can drain the water off but don’t press it, in this instance a bit of extra liquid is fine.
1/4 cup Stevia (or more – depending on how much you can stand the taste of stevia!)
1 lemon, unwaxed – zest and juice
1/2 cup raspberries (I only had frozen, just bunged them in as I was blending)
1 tsp vanilla extract
3 Tbs vegetable oil (I used rapeseed/canola)
1/2 cup cashews
pinch salt
Method: put the tofu in a blender. zest the lemon into the blender, juice the lemon and add to blender. Blend until it is the consistency of yogurt.
Add in the cashews (you may need to boil/soak/preblend them so they will get nice and smooth if you don’t have a powerful blender), oil, vanilla and salt and blend for a minute or so. Add in the raspberries. Blend until the filling is a uniform colour. It should be smooth and the consistency of a thick custard pudding. Pour the filling mix over the baked crust – the top will keep a bit of the impression of rivulets when it is poured over the crust rather than completely leveling out (what I think this is known as ribbon stage in baking?).
Bake at 45 minutes at 160c then just leave it to cool in the oven with the door closed for about an hour, then cover and chill before slicing.
Liddle dogs
Posted: June 23, 2018 Filed under: Uncategorized Leave a commentAhoy hoy! We got some little rescue dogs from Loughborough Dogs Trust (almost a year ago!).

They have been wonderful for getting us out and about in the parks of Leicester, and I have also got into making homemade baked treats for them.
The basic crunchy treat formula is something like 2/5 oat flour, 2/5 self raising wheat flour and 1/5 flavourings and seeds and nuts (e.g. mixed herbs, flax seeds and peanut butter), with a sprinkling of nutritional yeast. I bake them at a medium high temp for about 15 minutes, then cut them into little squares and slow bake them for another half hour or so to make tiny savoury rusk type things. I thought I might revive this blog to keep a more accurate record instead of just throwing the latest thing I bought in (today, hazelnuts and lentils!).
Pinto bean cracker recipe
Posted: January 30, 2016 Filed under: Baking, Uncategorized | Tags: beans, gluten-free, low fat, pinto beans, snacks, sunflower seeds, Vegan, vegetarian Leave a commentI’ve read a few things here and there (nicely summarized in this article) questioning whether beans should be soaked before cooking from dried. This kind of article seems to gloss over the reduction in cooking time as unimportant whereas for those worried about fuel costs and/or without a sufficiently large oven and reliant on the stovetop method it is worth it to halve the cooking time even if you have to wait longer overall. In addition, longer cooking time using the stovetop means more steam, so more condensation which is annoying to deal with sometimes.
Despite my misgivings I decided to try the no soak route with some pinto beans. It could be that my beans were just old, or not a good variety, but the results did not impress me. I got some beans bursting while others were still very firm, and the skins are the toughest I’ve experienced in a long time. Maybe I’ll give no-soak another go down the line, but for now I’m happy to do what I’ve always done, which is why I put 1kg chick peas in my preserving pot this morning, covered in plenty of cold water and won’t boil them up until later on tonight. Then I’ll portion them up and freeze most of them.
Still, I have lots of tough-skinned pinto beans to get through right now, unsuitable for stew-like uses, so I thought I’d try making some rustic crackers where the texture would add to the pleasantly munchy effect instead of being a chore.

Ingredients:
1 3/4 cups cooked, drained pinto beans
1/3 cup water
1/2 cup sunflower seeds
1/2 cup porridge oats
3 Tbs nutritional yeast (optional. I’m not sure this adds much but it was sitting around on the counter…)
1/2 tsp yeast extract (e.g. marmite), or miso paste would also probably be good.
1tsp mixed herbs (I used Italian mix which included dried peppers)
1-2 cloves of garlic or a pinch of garlic powder
1/2 tsp chilli powder
pinch salt
Method:
Line baking sheet and lightly grease with oil.
Put beans in a food processor (I used the mini chopper that came with my cheapo stick blender) and add 1/3 cup water. Pulse until a rough paste is formed, stopping to scrape down the sides as necessary. Add seeds and blend for a minute or so, stopping and scraping down again. Add oats and blend. Add rest of ingredients and blend. You should have a dough that is a bit sticky but that you can scoop up and roll into a ball-shape in your hands.
Taste a little pinch of the unbaked mix for seasoning. Obviously they’ll taste better once they’re baked and the flavours will concentrate a bit, but if they seem too bland for you then add more herbs or salt or maybe a dash of mustard or something.
Leave the dough to sit for about 20 minutes so the oats absorb excess moisture.
Take walnut-sized balls of dough (about a tablespoonful) and flatten them a bit with your hands, then place them on the baking sheet. Although they won’t spread, leave a gap because once they’re in place you can flatten them down further with the palm of your hand. I rubbed about 1/3 tsp olive oil across my palm before pressing down to get a nice smooth finish. You want them to be about 3mm (1/8 inch) thick.
Bake in a moderately hot oven (around 195c/380f/a bit above gas mark 5) for about 15 minutes (check they’re not burning after 10 mins. I don’t have fan assist and I haven’t checked my oven temp for a while!). Carefully flip them over and bake for another 5-10 minutes until they’re just starting to get a tinge of brown around the edges, so they’ll get nice and crunchy.
Cool on a rack and store in an airtight container. They’d probably freeze pretty well too.
Makes around 15 crackers.
Black Forest trifle
Posted: November 15, 2015 Filed under: Uncategorized | Tags: cake, cherries, chocolate, Plamil, pudding, Vegan 4 CommentsWell, I don’t know about where you live, but the weather has been a bit stink-o around here recently. I guess it goes with the time of year, but the wind and the rain doesn’t really help elevate my mood (which is pretty darn sombre after recent events in the news).
I’m not saying this recipe is going to cure all ills (especially since sugar is the devil these days to a lot of folks. Hey, I still love you, sugar!) but it was certainly a worthy use of leftover cake. I made my standard chocolate cake a few days ago (this time with added flaked almonds) but that’s quite a large amount of cake for one person to get through and I’m a bit short on freezer space so it’s heading towards stale. How to deal? Take some inspiration from ye olde Black Forest gateaux!

Sainsbury’s were selling frozen cherries at a slightly reduced price recently and I had managed to find space to squish those into my freezer. They also had a modest discount on Alpro custard pots. You may also recall that I am never without a large supply of Fair Trade chocolate from Plamil, so I simply cut up some cake, placed some frozen cherries on top, heated up a pot of custard, added a few spoonfuls of chocolate chips to melt in and about a tablespoon of rum then poured the latter over the former! A good 5 minutes work, if I say so myself 🙂
Leicester Vegan Fair 2015 is coming soon!
Posted: October 25, 2015 Filed under: Uncategorized | Tags: Leicester, Leicester vegan fair, LVF15, Vegan, vegan fair 1 CommentAnd it looks like it’s going to be amazing!
I really enjoyed the fair in 2013, which I wrote about here and this year it’s moved to a bigger venue at De Montfort University’s Queens Building, where the fair will run from 10am-4pm on 21st November, followed by an after-party at a nearby pub.
Here’s the poster:

There’s a good-looking mix of local and larger businesses, organisations and charities (and the charities usually have fancy calendars and chocolates and that kind of thing, which I like), a tempting array of purveyors of delicious things to shove in my gob (I cannot wait to see what Gelato Village bring to this fair!) and enough businesses who I’ve not encountered before for me to be intrigued.
I gather there’s going to be a family room which I heard and thought “sounds like it will be noisy and full of prams, I’ll stay away” but then I heard the person organising the room is planning all sorts of fun things, so I’ll probably have a good nosy around that as well.
I’m really starting to get excited about this event and it’s still over three weeks away! I hope there are a lot of visitors from Leicester and further afield because I really do think this city has a lot to offer vegans and those interested in eating more plant-based foods, and it gladdens my heart to see that we’re in the list of towns and cities putting on a fair this year.
There’s an events page on Facebook if you want to be reminded or there’s a community page where I think stall information is going to be added. Oh, and it’s on Meet-up under Leicester Vegans too, if you like to meet new people in a formal kind of way.
Hope to see you there! 🙂
More beady stuff (picture heavy, variable quality!)
Posted: October 1, 2015 Filed under: Uncategorized | Tags: beading, beads 1 Comment


A departure from food: beading bonanza!
Posted: October 1, 2015 Filed under: Uncategorized | Tags: beading, beads, bracelets, craft, purple, turquoise 3 CommentsMy cousin got me some wire, combination pliers and some seed beads as a Christmas present when I was 12 years old, and I’ve been a beader ever since. My first job out of school was as a jeweller, during which time I got a qualification in design and manufacture of fine jewellery, but I’ve always preferred cheap and cheerful, there’s so much more scope for grand sparkle and it’s so much less catastrophic if anything goes wrong!
Like many of my hobbies, it waxes and wanes. A few years ago I started teaching some simple projects as Adult Learners’ Week courses. I picked a design, broke it down into stages, purchased a lot of wire and beads in bulk (so much cheaper, as always!) and most of the people who came to my classes left with something wearable, which was quite pleasing when a lot had arrived proclaiming their supposed lack of skill.
This year I was recovering from surgery during the Adult Learners’ week and unable to deliver any classes, however I still have many kilos of beads left from previous years. I decided to make some quick bits and pieces to get my hand back in (I’m always meaning to make decorations for winter fairs, and then never quite getting round to it) so I made some earrings, some rings, a couple of necklaces. Then I started making some simple friendship-type bracelets and once started I kept thinking of different colour combinations I wanted to try. These are just one series (in my favourite colours) and I’ve made a couple more since I took this picture yesterday!

I’m thinking about organising a craft swap, so I’ll probably put up a couple more posts with some other bits I’ve made in a little while…
Hangover food: chickpea omelette sandwich
Posted: August 15, 2015 Filed under: Uncategorized | Tags: breakfast, chickpeas, comfort food, garlic, sandwich, Vegan, vegetarian 5 CommentsI haven’t been drinking much since recently, but went out to meet friends last night and had a couple of ciders. I thought I was being careful (my trick is to order a half pint of cider in a pint glass, topped up with soda water like a cheapskate even-lower-alcohol spritzer) but I still woke up feeling slightly rough this morning.
It seems to be a truth universally acknowledged that fried food and carbs are what’s wanted the morning after a night out. There wasn’t anything ready-made lying around but I had half a baguette in the freezer and while it was warming up in the oven I made a chickpea omelette using half a cup of dried chickpeas (could use chickpea flour/besan if you don’t have a blender that can tackle whole chickpeas), a cup of water, pinch of salt, pepper and smoked paprika and two cloves of garlic, plus a tiny dash of vinegar.
The trick to chickpea omelettes is to fry them low and slow, otherwise the innards stay gooey while the outsides scorch. This amount of batter made two, and the first one turned into scramble because I tried to turn it before it had set, but it still tasted great. I was more patient with the second one, so it’s a bit more photogenic!

Potato-onion-cakes fried in an onion ring (AKA the real delicious potatoes)
Posted: July 24, 2015 Filed under: Uncategorized | Tags: brunch, delicious potatoes, Fry's, onions, potatoes, recipe, Vegan, vegetarian 4 CommentsI hang out on the Post Punk Kitchen discussion forum and from time to time spammers chance their luck, as happens with all forums. The mods are great at deleting things pretty quickly, but I sometimes click through because they are occasionally hilarious.
This morning a spammer posted two “recipes” with some extremely weird ingredients, instructions that made no sense BUT one post (entitled “potato latkes”) was accompanied by a picture that made me want gussied-up fried potatoes – it was what looked like mashed potatoes and very finely diced spring-onions or green peppers bound by a ring of onion. The other post was entitled “delicious potatoes” and was clearly a picture of latkes, so I choose to think the picture illustrating latkes was actually the one that was supposed to go with the “delicious potatoes” recipe. I didn’t have spring onions or peppers, but here’s my interpretation anyway…

Delicious potatoes before baking
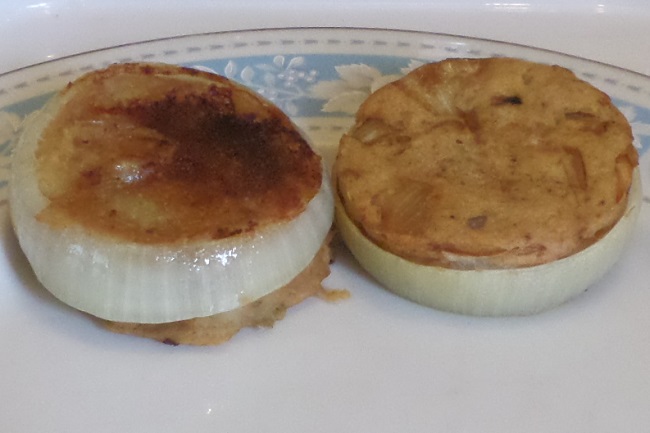
Delicious potatoes – baked vs. fried

Delicious potatoes as part of a delicious brunch
How I made the delicious potatoes:
250g potatoes, boiled, drained and mashed
A single 220g onion, sliced widthwise into 4
olive oil for frying and basting
1 tsp soya sauce
1tsp balsamic vinegar
1tsp Herbamare seasoning salt
1TBS nutritional yeast
1/2 tsp smoked paprika.
Method: Take the two middle (fat) slices of onion and separate the outer rings. I used 6 rings, but you might want to use 7 or 8 instead and underfill them a little bit, because the filling stays the same size and the onion rings shrink when they’re heated, as you can see from the second picture above.
Chop up the rest of the onion and fry it on a low-medium heat in a splash of olive oil with the soya sauce and balsamic vinegar until browned and caramelised, about 12-15 minutes.
Add the onion into the mashed potato, stir in the rest of the ingredients, pack the resulting mix firmly into the onion rings and either brush with oil and bake in a medium-hot oven around 200 degrees F for 12-15 minutes or fry for 5-6 minutes on each side in a pan. I tried both, and they both taste good, I think presentation-wise the fried ones look a bit more appetising but there’s not much in it.
I wasn’t just going to eat 6 delicious potato cakes on their own (although I probably could!) so I cooked up some fancy baked beans (by fancy I just mean I spooned some from a tin and added a few peas, tomatoes, slices of garlic and chopped fresh coriander), Fry’s frankfurter-style sausages and a few fried mushrooms. Very pleasant brunch indeed!
Home-made soya yoghurt the lazy way.
Posted: July 17, 2015 Filed under: Uncategorized | Tags: budget, DIY, frugal, soya, soya milk, Tesco, value, Vegan, yoghurt 1 CommentI do actually own a yoghurt maker, which was a gift from my parents. It’s a nice round contraption with cute little jars which make great individual serving sizes, and it keeps a constant temperature so a great guarantee of consistent results, and super-handy in winter time. The little jars are a bit of a faff to sterilise though, and at the moment I’m going through a lot of yoghurt because I like to use it as a salad dressing mixed with vinegar, smoked paprika, garlic and hot sauce, so I thought I’d try something new.

UHT soya milk is already sterile, so no need to scald it then wait for it to come down to temperature (110-115F), instead I got a large stock pot (also a gift from my folks!) and filled it 3/4 full of warm water. I got the temperature to around 120 degrees and then stood two sealed litre cartons of milk in the pot (one Value and one Organic one I had left over from when they were on offer for 59p!) and left them for 20 minutes to warm through. I then opened them up and tipped some of the milk into a glass for later (to make a bit of room in the cartons), and tipped a bit more into a measuring jug. I mixed about 6 heaped tablespoons of live plain soya yoghurt into the milk in the jug, and them poured half into each carton, sealed them well up and stood them up in the water bath, which came to just below the tops of the cartons.
The temperature had dropped to just below 110 degrees when I put them back in, but I just put the gas on a low heat underneath until they’d come up to 115, then draped a folded bath sheet over the top and sides. The volume of water kept a good heat (I think it being a warm day probably helped too), and after 7 hours I had yoghurt! It’s a bit lumpy, but I’m just going to be mixing it up with other stuff so I don’t care.
One concern I had (after I’d started making it) was that the cartons tell you to store them in a “cool, dry” place, which the stock pot most definitely was not! I started worrying that the plastic lining of the cartons wasn’t designed to be heated, and would leach harmful bits of itself into my yoghurt, and when I tried to find information on how safe Tetra Paks are to heat food in it was surprisingly difficult, however I did find something assuring consumers that they’re designed to withstand heat such as being left in a hot car, and a car’s interior can get well above yoghurt making temperature in the summer so it looks like it’ll be okay! 🙂

Recent Comments